
🌶️ Creamy Cheesy Chicken Wraps 🌮 — A Flavor-Packed, 20-Minute Dinner Game-Changer
1. Introduction
There’s nothing quite like the comfort of warm, tender chicken wrapped in a soft tortilla and enrobed in rich, melty cheese—especially when it’s ready in under 20 minutes. These creamy cheesy chicken wraps deliver bold, savory-sweet richness with just the right hint of spice and a satisfying texture contrast. Whether you’re rushing through a weeknight dinner or planning a last-minute crowd-pleaser for game day, this recipe strikes the perfect balance between speed, simplicity, and indulgence.
Inspired by the deep, smoky-sweet richness of my Dump-and-Go Smothered Pork Chops and the comforting tang of my Best Homemade Tomato Soup, these wraps combine familiar family-favorite flavors into a handheld delight. Let’s get cooking!
2. Why You’ll Love This Recipe
- Ready in 20 minutes—faster than takeout, healthier, and infinitely more satisfying.
- One-pan wonder—minimal cleanup and maximum flavor development.
- Family-approved: picky eaters and foodie veterans alike are obsessed with the creamy, tangy, cheesy combo.
- Versatile: swap proteins, spices, or fillings to suit dietary needs or seasonal produce.
- Friendly leftovers: tastes just as good (if not better!) the next day.
Looking for more quick chicken wraps that deliver maximum flavor? Try my Easy Buffalo Chicken Sliders for a spicy twist—or the Hearty-One-Pan Ground Beef Homo Casserole for a cozy, hearty alternative.
3. Ingredient Notes
Every ingredient in this recipe plays a critical role—not just in flavor, but in texture and mouthfeel. Here’s why I’ve chosen each one:
- Chicken breast: Lean and quick-cooking, but I always pound it to even thickness to prevent drying. You can use thighs for extra juiciness if you prefer.
- Fresh garlic + onion powder: The backbone of savory depth. Powdered versions add layered flavor without burning in the pan.
- Cream cheese + sour cream: This duo creates our luscious base— cream cheese brings body; sour cream adds brightness and tang. Cold cream cheese breaks easier, so soften it 10 minutes before mixing.
- Shredded cheese blend: I use Monterey Jack + sharp cheddar for melty richness and sharpness. Pre-shredded works fine, but freshly shredded melts smoother and tastes better.
- Whole wheat or spinach tortillas: 8-inch size prevents overfilling and tearing. Warm them first—they’ll be pliable and won’t crack.
- Fresh spinach: Adds color, nutrients, and a peppery bite that cuts through the creaminess.
- Hot sauce (optional): Just a dash of your favorite—like Frank’s RedHot—ties the whole flavor story together.
4. Kitchen Tools You Need
These wraps are simple—but using the right tools makes all the difference. Here’s what I reach for in my own kitchen:
- T-fal 14-Piece Hard Anodized Nonstick Cookware Set: The nonstick surface ensures your chicken browns evenly without sticking, and the deep skillet helps steam the wraps later without burning.
- Deluxe 33-Piece Silicone Utensil Set: Flexible spatulas gently flip tortillas—no cracking, no tearing. Heat-resistant up to 600°F!
- A cast-iron or heavy-bottom skillet: Retains heat better for that perfect sear on the chicken and crispy outer wrap layer.
- Microplane zester: For freshly grated garlic or lime zest (Bonus: a squeeze of lime brightens the whole dish).
Post-cooking? Keep wraps fresh for next-day lunches with JoyJolt Airtight Glass Food Storage Set—durable, leak-proof, and microwave-safe.
5. How to Make Creamy Cheesy Chicken Wraps
Phase 1: Sear & Season the Chicken
Heat 1 tablespoon olive oil over medium-high in your skillet. Pat chicken breasts dry, season generously with salt, pepper, garlic powder, and onion powder. Sear 5–6 minutes per side until golden and cooked through (165°F internal temp). Let rest 5 minutes before slicing thin—I like to slice against the grain for maximum tenderness.
Phase 2: Make the Creamy Cheese Sauce
Reduce heat to medium-low. Add 2 oz softened cream cheese and ¼ cup sour cream to the same skillet (no need to wash). Stir constantly until smooth and glossy—about 2 minutes. Add ¾ cup shredded cheese and stir until fully melted. A splash of hot sauce brings out the savory bass note.
Phase 3: Warm Wraps & Assemble
Warm tortillas in the dry skillet for 20 seconds per side, or wrap in a damp towel and microwave for 20 seconds. Lay each flat, layer with:
- 2 tbsp spinach
- 1–2 tbsp creamy chicken sauce
- 3–4 oz sliced chicken
Roll tightly—fold sides inward first like a burrito, then roll from the bottom. For extra crispness, return to the skillet over medium for 60 seconds per side until golden and charred in spots.
Phase 4: Slice & Serve
Cut diagonally—the angled slice shows off those beautiful layers and makes them easier to handle. Top with extra cheese, a dollop of sour cream, or fresh cilantro. Serve with extra sauce on the side (it’s that good).
6. Expert Tips for Success
- Cool the sauce slightly before adding cheese: Hot sauce = grainy cheese. Patience is key for silkiness.
- Don’t overfill: Too much filling = soggy tear zones. Stick to ~4 oz protein per wrap.
- Pound the chicken: Uneven thickness causes dry spots. A rolling pin works great!
- Toast the tortilla: A quick sear in the pan firms up the shell and helps hold everything together.
- Let the cream cheese soften: Trying to stir cold cream cheese into sour cream? It’ll seize and lumpy. 10 minutes at room temp solves this.
7. Variations & Substitutions
- Vegetarian: Swap chicken for sautéed portobello mushrooms or tempeh “strips” seasoned with smoked paprika.
- Low-Carb: Use large lettuce leaves (romaine or butter lettuce) or low-carb tortillas like Mission Low Carb.
- Dairy-free: Use cashew-based cream cheese + dairy-free cheddar shreds (Kite Hill and Violife make excellent options).
- Spicier version: Add chipotle in adobo to the sauce, or top with pickled jalapeños.
- Extra veggies: Thinly sliced red bell pepper, roasted corn, or black beans add sweetness and fiber.
8. Storage & Reheating
Store assembled wraps (uncooked or partially cooked) in airtight containers for up to 3 days. For best results, wrap tightly in parchment, then foil, to prevent sogginess.
- To reheat: Air fry at 350°F for 4–5 minutes until crispy. Oven at 325°F for 10–12 minutes (tent with foil to avoid drying).
- Not recommended to freeze—the sauce may separate and tortillas get gummy. But the chicken and sauce freeze well separately for up to 2 months.
9. FAQ
Can I make these ahead of time?
Absolutely! Prep the chicken and sauce 1–2 days in advance. Assemble wraps just before cooking or serving—pre-wrapping tortillas too early = soggy centers.
What sides pair best?
These pair beautifully with a crisp homemade tomato soup, seasoned black beans, or a simple arugula salad with lemon vinaigrette. My Cheesy Hashbrown Crockpot Potato Soup also makes a killer hearty side.
My sauce is too thin—what went wrong?
If your sauce is runny, it’s likely undercooked or too much liquid (from veggies or over-thawed chicken). Simmer 2–3 minutes longer to reduce, or stir in 1 extra tsp cream cheese. For next time, drain veggies well or use fresh spinach instead of frozen-thawed.
Can I bake or air frythese wraps?
Yes! Air fry at 375°F for 4–5 minutes, flipping halfway. For baking, use 350°F for 10–12 minutes (cover with foil after 5 minutes to prevent burning). Air frying gives the crispiest finish—my Ninja Air Fryer Pro Crisp & Roast 4-in-1 delivers beautifully browned, evenly cooked wraps every time.
10. Conclusion
These creamy cheesy chicken wraps are a triumph of speed, simplicity, and soul-warming flavor. With tender chicken, rich cheesy sauce, and just the right supporting cast—it’s the dinner that feels indulgent but takes less time than ordering in. Save this recipe for your next busy weeknight—or impress guests with minimal prep and maximum payoff.
And if you love this easy win, you’ll adore my Buffalo Chicken Sliders and Hobo Casserole for more one-pan wonders.
Print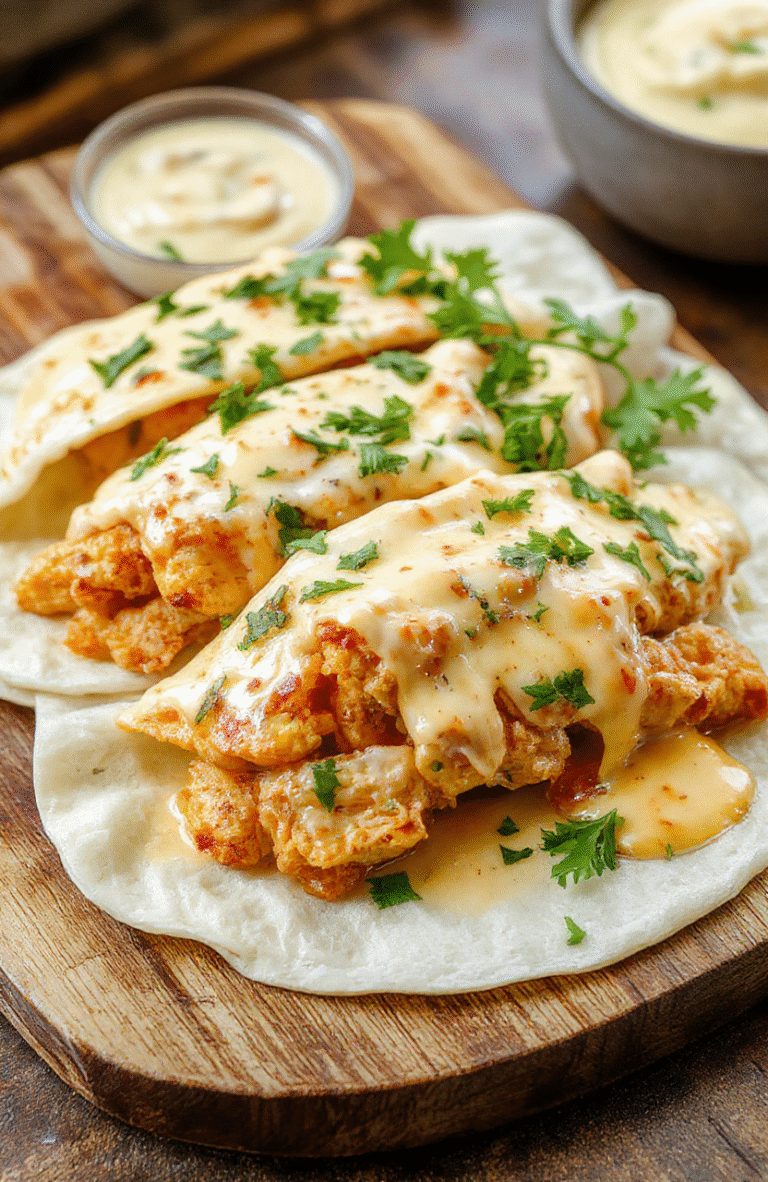
Creamy Cheesy Chicken Wraps
A quick, satisfying, and crowd-pleasing dinner with tender chicken, melted cheese, and zesty salsa wrapped in soft tortillas.
- Total Time: 15 minutes
- Yield: 2 wraps
Ingredients
- 2 boneless, skinless chicken breasts, sliced thin
- 4 large flour tortillas
- 1 cup shredded cheddar cheese
- 1/2 cup cool Whip cream cheese, softened
- 1/4 cup salsa
- 1 tsp taco seasoning
- 1 tbsp olive oil
- Fresh cilantro and lime wedges for garnish
Instructions
- Heat olive oil in a skillet over medium-high heat. Add chicken and taco seasoning; cook 5–6 minutes until no longer pink.
- Stir in salsa and cream cheese; cook 2–3 minutes until sauce is smooth and creamy.
- Place 1/4 of the chicken mixture on each tortilla, top with cheese, and roll tightly.
- Optional: Heat wraps in a pan or air fryer 2–3 minutes per side until cheese melts.
- Garnish with cilantro and serve with lime wedges.
Notes
- For extra heat, add diced jalapeños to the filling.
- Prep ahead: Cook chicken filling up to 2 days in advance and store refrigerated.
- Use gluten-free tortillas for a GF option.
- Prep Time: 5 minutes
- Cook Time: 10 minutes
- Method: Stovetop
- Cuisine: American-Mexican Fusion
- Diet: High Protein
Nutrition
- Serving Size: 2 wraps
- Calories: 498 Kcal
- Sugar: 5g
- Sodium: 1021mg
- Fat: 28g
- Saturated Fat: 13g
- Unsaturated Fat: 12g
- Trans Fat: 0g
- Carbohydrates: 38g
- Fiber: 3g
- Protein: 35g
- Cholesterol: 98mg