🍗🔥 Crispy Buttermilk Fried Chicken Tenders That’ll Melt in Your Mouth (andBeat Chick-Fil-A at Home!) 🍗✨
1. Introduction
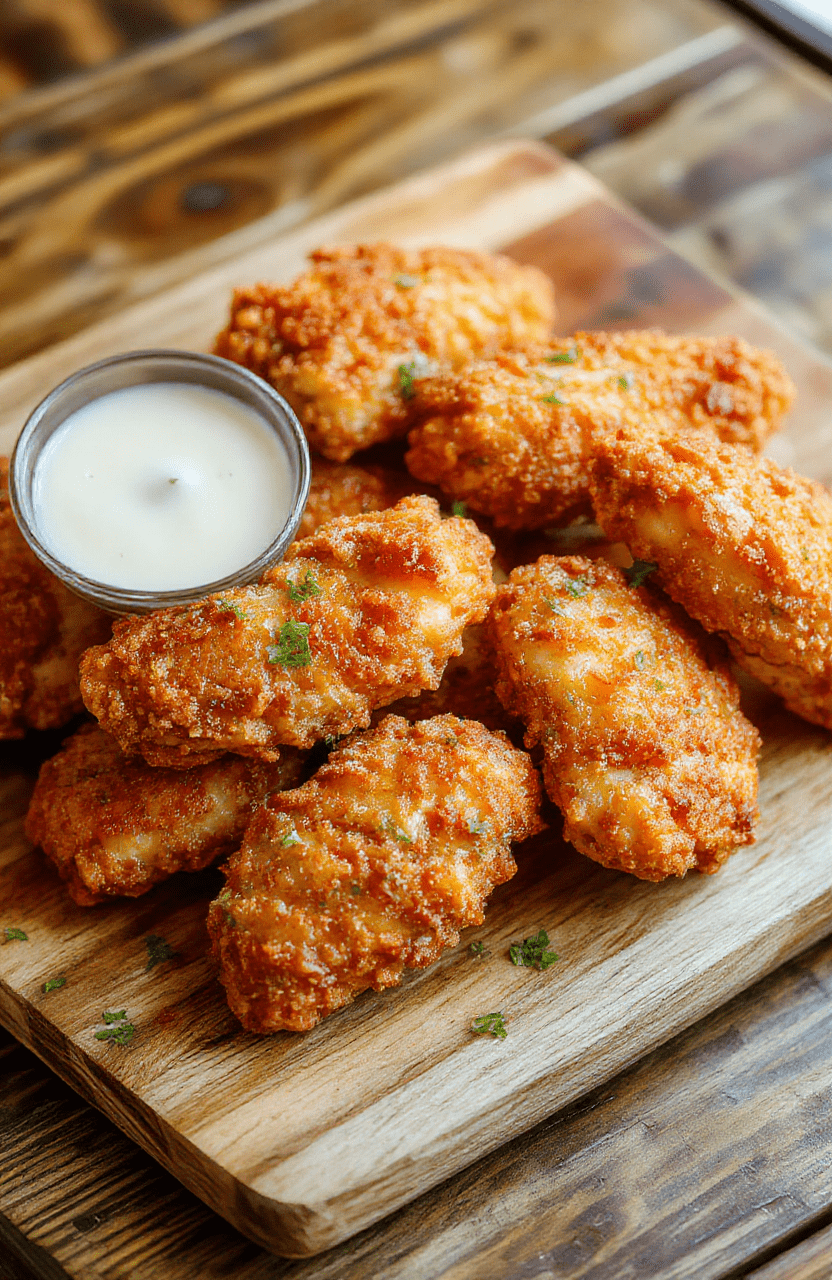
Nothing beats the crunch of perfectly seasoned, golden-brown crispy chicken tenders —juicy inside, shatteringly crisp outside, and drenched in your favorite dipping sauce. This homemade Chick-Fil-A copycat recipe deliversrestaurant-quality tenderness with a seriously satisfying bite. We brine, dust, and double-coat in buttermilk and seasoned flour for a crispy buttermilk fried chicken experience that’s lighter, more flavorful, and 100% doable for a quick weeknight chicken dinner. I’ve tested this recipe over and over in my own kitchen, adjusting spice levels, frying times, and resting techniques — and I’m confident this is the most foolproof, delicious version you’ll find online.2. Why You’ll Love This Recipe
- ✅ Ready in under 30 minutes after a brief 15-minute brine (no overnight soak needed!) — perfect for busy weeknights
- ✅ One-bowl marinade, one-dredge technique — minimal cleanup, maximum flavor
- ✅ Buttermilk tenderizes naturally without overpowering tang
- ✅ Shatteringly crisp exterior that stays crunchy for 10+ minutes (no sogginess!)
- ✅ Versatile for air fryer, oven, or传统 oil fryer — instructions included for all
3. Ingredient Notes
Why every component matters — and my go-to upgrades:- Chicken tenders (or strips) — Opt for organic, antibiotic-free if possible. They cook faster and taste sweeter. If using boneless thighs, adjust time by +2–3 minutes.
- Buttermilk — Full-fat, not “cultured buttermilk substitute.” The fat content ensures richness and moisture. If you’re out, use 1 cup milk + 1 tbsp lemon juice, rested 10 mins.
- Granulated sugar — Not just for sweetness; it promotes browning during frying for that deep golden crust.
- Paprika — Use smoked sweet paprika (not hot) for depth. A pinch of cayenne in the flour adds a subtle kick.
- Pork scratching crumbs (or crushed cornflakes) — This is my pro secret! They add extra crunch factor and absorb oil less than breadcrumbs, stay crisp longer.
- Vegetable or peanut oil — High smoke point is key. Avoid olive oil or butter. For air fryers, avocado oil spray gives the cleanest finish.
4. Kitchen Tools You Need
You’re not just throwing chicken in a pan — the right tools make or break the crunch.- 🎯 Ninja Air Fryer Pro Crisp & Roast 4-in-1 — My top pick. 360° air circulation ensures even browning, and the rapid preheat gets you to 400°F in under 3 minutes. No more cold spots or sogginess.
- 🍳 T-fal 14-Piece Hard Anodized Nonstick Cookware Set — For deep frying. The heavy bottom prevents hot spots, and the nonstick coating makes cleanup a breeze after that crispy coating sticks like gold dust.
- 📏 Clever Fox DIY Family Recipe Journal — Write down your tweaks: “+½ tsp garlic powder next time,” “180°F internal = perfect,” and watch your skills evolve. Recipe memory is precious!
- ❄️ JoyJolt Airtight Glass Food Storage Set — Store leftovers in style. The glass prevents odor transfer, and the seal keeps tenders crisp longer.
- ⏳ Timer (not optional!) — I use the one in my Ninja Air Fryer, but a standalone magnetic timer goes on the stove for deep-frying. 3 minutes is the magic number — too long = dry, too short = pale and greasy.
5. How to Make Crispy Buttermilk Fried Chicken Tenders
Phases
- Brine & Prep (5 mins + 15 mins rest) Cut tenders into 1.5-inch strips. Whisk buttermilk, hot sauce, salt, pepper, and sugar. Submerge chicken — peel film tight with plastic wrap to prevent splashing and ensure full coverage. Let sit 15 minutes (15—not 30 — this is lean meat).
- Dredge Station: Double Coat for Maximum Crunch (5 mins) In one bowl: flour, paprika, garlic powder, onion powder, cayenne, and **½ cup crushed cornflakes or pork rinds**. In a second bowl: extra flour (just for double-dredging). → Dip each piece in dry flour (shake off), backsplash in buttermilk, press into seasoned flour mix (press firmly), repeat press-press step. Pro tip: Let coated tenders rest 2 minutes before cooking — this sets the crust.
- Fry or Air Fry (See below) For deep fry: Heat oil to 350°F. Fry 3–4 tenders at a time, 2.5–3 minutes, until golden and internal temp hits 165°F. Drain on a wire rack (NOT paper towels — steam softens the crust!). For air fry: Preheat at 400°F. Spray tenders lightly with oil. Air fry 10 minutes, flip, spray again, fry 5–7 more minutes until golden and 165°F.
- Rest & Serve (2 mins) Let sit uncovered for 2 minutes — this firms up the crust and prevents sogginess. Serve warm with lemon wedges and dipping sauces: honey mustard, chipotle mayo, or spicy aioli.
6. Expert Tips for Success
- Pat chicken DRY before brining — wet skin = poor adhesion and uneven browning.
- Double-dredge, but don’t shake — press the coating on with your fingertips. No loose flour = less greasiness.
- Maintain oil temp — drop a breadcrumb in; if it sizzles within 2 seconds, you’re good. Too hot = burnt outside, raw inside. Too low = oillogged.
- Use a wire rack over a tray — itlets air circulate under the tenders so they stay crisp.
- Test with a thermometer — chicken shrinks fast. Pull at 160°F; carryover heat brings it to 165°F.
7. Variations & Substitutions
- Gluten-Free — Swap flour for almond flour + rice flour (50/50), and use crushed gluten-free corn nuts or crushed pork rinds.
- Spicy Kick — Add 1 tsp cayenne + 1 tbsp gochugaru (Korean chili) to the flour mix.
- Herb-Crusted — Mix in 1 tbsp dried thyme + 1 tsp dried dill to the coating.
- Healthy Swap — Air fry only, skip second dredge, use buttermilk substitute. Still crispy, just lighter.
- Vegan — Try cauliflower steak or heart of palm in place of chicken (brine for 30 mins, air fry 12–14 mins).
8. Storage & Reheating
- Fridge — Store in airtight container up to 4 days. Layers of paper towel help absorb excess oil.
- Freezer — Freeze uncooked coated tenders on a tray, then transfer to a freezer bag. Cook from frozen — add 2–3 minutes to air fry time.
- Reheat best in air fryer — 375°F for 4–6 minutes,spritz with oil. Don’t microwave — it turns the crust rubbery and oily.
9. FAQ
Q: Why did my chicken turn out greasy?
A: Oil too cool, or coating too thick. Double-dredge with *pressing*, not shoving. Maintain 350°F — use a thermometer.
Q: Can I make these ahead for guests?
A: Yes! Double-batch, freeze uncooked, and air fry straight from frozen. Serve instantly — looks fresh, tastes amazing.
Q: My chicken stuck to the basket. How do I prevent that?
A> Preheat your air fryer. Lightly grease basket with oil spray *before* adding tenders. Don’t overload — leave ½ inch between pieces.
Q: Is buttermilk absolutely necessary?
A: It tenderizes and adds tang. For a quick substitute, use 1 cup milk + 1 tbsp vinegar, rested 5 mins. Flavor is close, but texture is *slightly* less tender.
10. Conclusion
Crispy chicken tenders don’t need a drive-thru. With this homemade Chick-Fil-A copycat method, you control the ingredients, the flavor, and the crunch. Whether you’re serving them on buns for sliders (see my Easy Buffalo Chicken Sliders next!), alongside mashed potatoes, or as a quick protein for lunch, these tenders are a crowd-pleaser — and they’re ready in minutes. Grab your air fryer, print the list, and get frying. Your taste buds will thank you.Want more family-friendly hits? Try my Sweet & Spicy Honey Pepper Chicken or Dump-and-Go Smothered Pork Chops for next-level comfort food.
Print
Crispy Buttermilk Fried Chicken Tenders
Homemade crispy chicken tenders with buttermilk brine and panko coating—crisp outside, juicy inside, no deep fryer needed.
- Total Time: 25 minutes
- Yield: 4 servings
Ingredients
- 1 lb boneless, skinless chicken breasts, cut into strips
- 1 cup buttermilk
- 1 tsp garlic powder
- 1 tsp onion powder
- 1 tsp paprika
- 1 tsp salt
- 1/2 tsp black pepper
- 1 cup all-purpose flour
- 2 large eggs, beaten
- 1 1/2 cups panko breadcrumbs
- 1/4 tsp cayenne pepper (optional)
- Vegetable oil for frying
Instructions
- In a bowl, mix buttermilk, garlic powder, onion powder, paprika, salt, and pepper. Add chicken strips and marinate for at least 30 minutes (or up to 4 hours in fridge).
- In a shallow dish, combine flour, cayenne (if using), and a pinch of salt. In another dish, beat eggs. In a third dish, place panko breadcrumbs.
- Dredge each chicken strip in flour, shaking off excess. Dip in egg, then coat thoroughly in panko. Place on a wire rack for 5 minutes.
- Heat 1/2 inch vegetable oil in a skillet over medium heat to 350°F (175°C).
- Fry tenders 3–4 minutes per side until golden brown and internal temp reaches 165°F (74°C).
- Drain on a wire rack or paper towel-lined plate. Serve warm with dipping sauce.
Notes
- For extra crispiness, double-dip: after first panko coat, dip again in egg and panko.
- No thermometer? Drop a breadcrumb into the oil—it should sizzle immediately.
- Bake option: 400°F (200°C) for 15–18 minutes, flipping halfway, until golden.
- Prep Time: 15 minutes
- Cook Time: 10 minutes
- Method: Pan-frying
- Cuisine: American
- Diet: Contains Gluten, Dairy, Eggs
Nutrition
- Serving Size: 3 tenders
- Calories: 380 Kcal
- Sugar: 2 g
- Sodium: 680 mg
- Fat: 19 g
- Saturated Fat: 4 g
- Unsaturated Fat: 12 g
- Trans Fat: 0.2 g
- Carbohydrates: 32 g
- Fiber: 1 g
- Protein: 28 g
- Cholesterol: 95 mg