🍯 Sticky Honey Garlic Chicken: A One-Pan Dinner That Steals the Show
1. Introduction
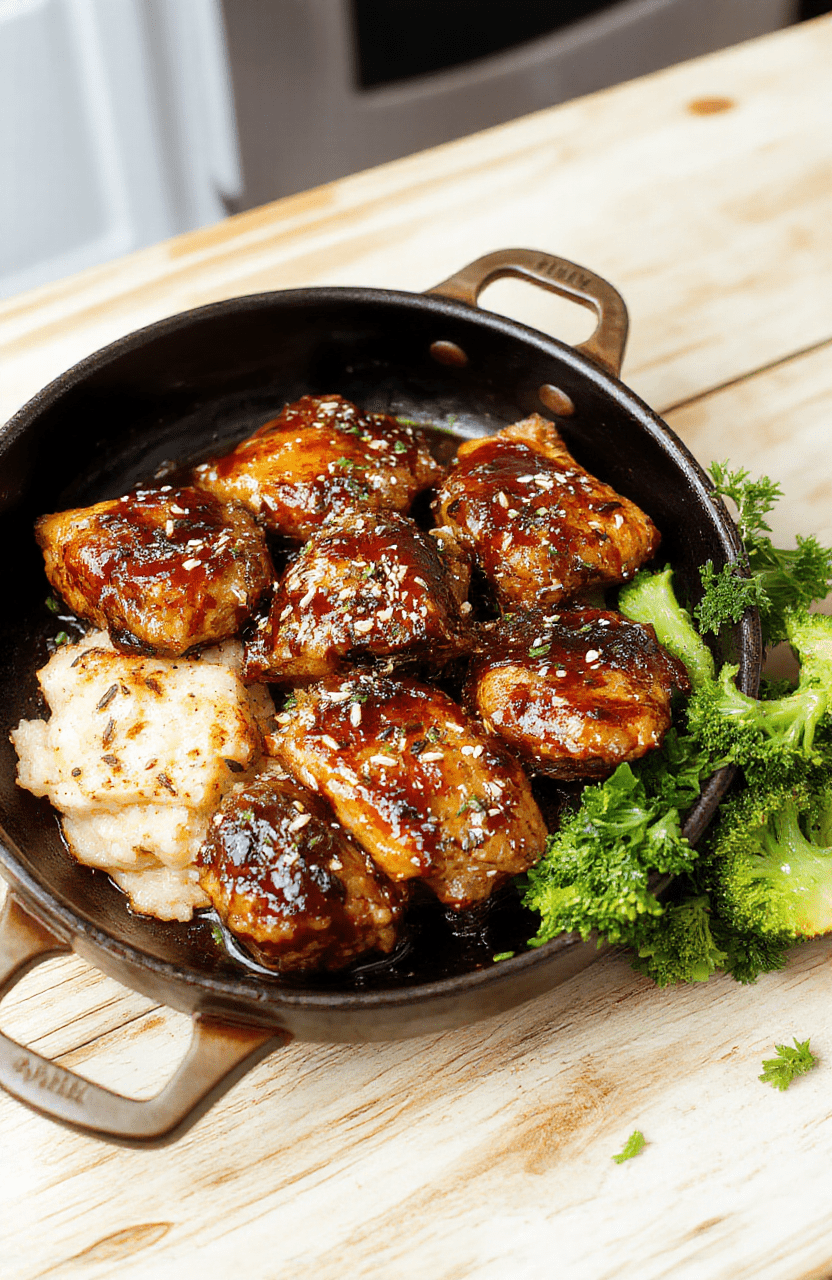
There’s something deeply comforting about Honey Garlic Chicken—sweet, tangy, savory, and utterly irresistible. This One Pan Dinner delivers rich, caramelized perfection in under 30 minutes, with minimal cleanup and maximum flavor. Juicy chicken thighs glaze themselves in a glossy, aromatic sauce made with real garlic, fresh ginger, and pure honey. It’s a Healthy Chicken Recipe that feels indulgent without the guilt—especially when served with roasted veggies or over fluffy rice. I’ve made this dish countless weeknights, and it’s never failed to impress my family (or even skeptical dinner guests!). Grab your sheet pan and get ready for a new favorite.
2. Why You’ll Love This Recipe
- ✅ Ready in 30 minutes or less—perfect for busy weeknights
- ✅ One-pan cooking means less cleanup, more enjoyment
- ✅ Balanced flavors: sweet honey balances sharp garlic and a hint of soy
- ✅ adaptable—works with chicken thighs, breasts, or even tofu
- ✅ Meal-prep friendly—tastes even better the next day
3. Ingredient Notes
The magic of this Honey Garlic Chicken lies in quality and balance. Here’s why each component matters:
- Chicken thighs: I favor boneless, skin-on thighs because they’re forgiving, stay incredibly juicy, and crisp up beautifully on the pan. If you prefer breasts, slice them uniformly (about ¾” thick) to avoid dry spots.
- Fresh garlic, not powdered: Minced fresh garlic sings in this glaze—aromatic, pungent, and essential for depth. Don’t skip the pinch of red pepper flakes for a gentle wake-up call.
- Raw honey: Its floral notes and natural sugars caramelize beautifully. Avoid “heated” honey blends—they lack complexity.
- Low-sodium soy sauce: Gives umami without overwhelming saltiness. Tamari works great for gluten-free needs.
- Fresh ginger: Grated just before use for bright, zesty warmth. Pre-grated loses potency fast.
- Sherry or rice vinegar: A splash adds crucial acidity to balance the sweetness and lifts the entire sauce.
4. Kitchen Tools You Need
You don’t need a fancy haul—but having the right tools makes this dish smoother, crispier, and more enjoyable:
- T-fal 14-Piece Hard Anodized Nonstick Cookware Set: This set’s heavy-duty, warp-resistant pans ensure even heat distribution—critical for getting that golden-brown sear on your chicken without sticking. I’ve used mine daily for years, and it still performs like day one.
- Compact 6-in-1 Digital Air Fryer by Amazon Basics: Love crispy边缘? Run your glazed chicken under the air fryer for 2–3 minutes at 400°F for crackling texture—without turning on the oven.
- Deluxe 33-Piece Silicone Utensil Set: Non-scratch, heat-resistant tools let you flip, glaze, and fold without damaging your pans. The tongs are *perfect* for turning chicken mid-glaze.
- Fullstar Ultimate Veggie Prep Master: Gets your garlic minced, ginger grated, and broccoli florets chopped in seconds. A time-saver I swear by.
5. How to Make Sticky Honey Garlic Chicken One Pan Dinner
Phase 1: Prep & Prep-Step (5 mins)
Preheat your oven to 400°F (200°C). Pat chicken thighs *very dry* with paper towels—this step is non-negotiable for browning. In a small bowl, whisk together 3 tbsp honey, 2 tbsp soy sauce, 1 tbsp rice vinegar, 3 minced garlic cloves, 1 tsp grated ginger, ½ tsp black pepper, and ¼ tsp red pepper flakes. Set aside. Chop 1 head of broccoli into florets and peel/cut 2 carrots into sticks (about 1″ long).
Phase 2: Sear & Roast (15 mins)
Heat 1 tbsp avocado oil in a large, oven-safe skillet (or sheet pan lined with parchment) over medium-high heat. Sear chicken thighs, skin-side down first, for 5–6 minutes until deeply golden. Flip and cook 2 more minutes. Add broccoli and carrots around the chicken—don’t crowd them. Pour *half* the honey garlic sauce over everything.
Transfer the whole pan to the oven. Roast for 12 minutes. Carefully remove, pour the *remaining* sauce over the chicken and veggies, and return to oven for 3–4 minutes, or until the chicken hits 165°F and the sauce bubbles and thickens.
Phase 3: Glaze & Garnish (2 mins)
Let rest 5 minutes—this lets the juices redistribute and the sauce set. Sprinkle with sesame seeds and sliced green onions. Serve over rice, roasted potatoes (like these!), or straight from the pan.
6. Expert Tips for Success
- Do NOT stir while_roasting: Let the sauce caramelize on contact—stirring releases starch and prevents glazing.
- Acid is your secret weapon: That splash of vinegar cuts sweetness and prevents “cloying.” Taste before adding—it should lean *tangy* initially.
- Chicken temp matters: Use a thermometer! Overcooked thighs turn rubbery. Pull at 160°F—it’ll carryover to 165°F.
- Double the glaze, double the fun: I often make 1.5x the sauce. Use extra to drizzle over leftovers or toss with noodles (try it with this noodle combo).
7. Variations & Substitutions
- Vegan: Swap chicken for extra-firm tofu (pressed & cubed) or mushrooms. Glaze stays the same—you’ll roast 20–22 minutes.
- Sugar-Free: Use monk fruit sweetener blend + 1 tbsp molasses for depth. Skip honey entirely.
- Spicier: Add 1 tsp gochujang or ½ tsp cayenne to the glaze.
- Lower-Carb: Skip the sugar in the glaze, and serve over cauliflower rice or roastedradish “noodles.”
- One-Pot Upgrade: Stir in ½ cup cooked quinoa or rice at the end for a complete meal.
8. Storage & Reheating
Store cooled leftovers in airtight glass containers for up to 4 days. Reheat gently in a skillet over medium-low to re-crisp the chicken skin (oven reheats dry). For best texture, keep glaze separate and add just before serving. The chicken marinade *in* the glaze actually improves flavor overnight—so it’s worth making a batch ahead!
9. FAQ
Q: Can I use chicken breasts?
A: Absolutely! But slice them to equal thickness, reduce cook time by 3–4 minutes, and checking temp is critical. They dry out faster than thighs.
Q: Why is my sauce too thin?
A> Honey thinning? It’s likely still cooking down! Let the glaze bubble 1–2 minutes longer to thicken. If too thin after cooking, mix 1 tsp cornstarch + 1 tsp water and stir in until glossy.
Q: Can I make this air fryer-style?
A> Yes—toss chicken and veggies in half the glaze, air fry at 380°F for 12 mins, shake, brush on remaining glaze, and air fry 3 more mins until caramelized.
Q: What sides pair best?
A> Steamed jasmine rice, simple orzo, or the creamy gnocchi from earlier—this honey glaze cuts rich dishes beautifully.
10. Conclusion
This Sticky Honey Garlic Chicken One Pan Dinner is the ultimate balance of effort and ease. It’s bold, comforting, and impressively versatile—while still being healthier than takeout. I hope it becomes your go-to when time is tight but taste must speak volumes. Tag me if you try it—I love seeing your twists!
Print
Sticky Honey Garlic Chicken One Pan Dinner
A simple, weeknight friendly one-pan dish featuring juicy chicken baked in a sticky honey garlic sauce with a savory soy glaze. Serve with rice and vegetables for a balanced meal.
- Total Time: 30 mins
- Yield: 4 servings
Ingredients
- 1 pound chicken thighs or breasts, cut into bite-sized pieces
- 2 tablespoons soy sauce
- 2 tablespoons honey
- 3 cloves garlic, minced
- 1 teaspoon grated ginger
- 1 tablespoon rice vinegar
- 1 tablespoon olive oil
- 1 teaspoon cornstarch dissolved in 2 tablespoons water
- Sesame seeds, for garnish
- Chopped green onions, for garnish
- Rice or vegetables, for serving
Instructions
- Heat olive oil in a large skillet over medium heat.
- Add chicken and sear until browned on all sides.
- Stir in garlic and ginger until fragrant, then add soy sauce, honey, and rice vinegar.
- Simmer until the sauce thickens, stirring occasionally.
- Stir in the cornstarch slurry to glaze the chicken smoothly.
- Garnish with sesame seeds and green onions; serve with rice and vegetables.
Notes
- For faster cooking use chicken breast; adjust cooking time accordingly.
- To make it gluten-free, use certified gluten-free soy sauce.
- Double the sauce if you like a saucier dish.
- Prep Time: 15 mins
- Cook Time: 15 mins
- Method: Stovetop
- Cuisine: American
- Diet: Dairy-Free
Nutrition
- Serving Size: 1 serving
- Calories: 320 Kcal
- Sugar: 14 g
- Sodium: 620 mg
- Fat: 14 g
- Saturated Fat: 3 g
- Unsaturated Fat: 9 g
- Trans Fat: 0 g
- Carbohydrates: 20 g
- Fiber: 0 g
- Protein: 28 g
- Cholesterol: 85 mg